{ Minilux Tips }


The thing about Minilux is that in the hand of the novice, it feels and uses just like a simple P&S. However, over the years that I used it, I have discovered features that I found to be useful for advanced users. I wrote it down here to share with other Minilux fans.


  • Shutter speed and aperture values will display on the LCD panel for a few second after you half depress the shutter. In the aperture-priority mode, only the shutter speed (of course!) is displayed.
  • Hyperfocus (or manual focus) mode. For anyone that venture into manual focus mode of Minilux, the straightforward approach is to set the manual focus setting to an approximate subject distance. 

    If you happen to bring the DOF table like below, you could also take your time and choose the range of clarity by using aperture-priority mode plus manual focus. 

    However, if the far end of subject's DOF is infinite, there is a trick of estimating near end of the DOF without referring to the table. (I first learned about it from Mr. Richard Saylor at this site). 
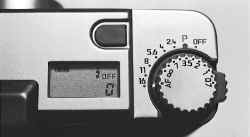
For example, referring to the following Minilux's photo, if you select the aperture (say f16) and align the green AF dot to the aperture, the DOF is about infinity to half of the "green P" indicates (3.5 meter/2) of 1.75m. More precisely, referring to the green box of DOF table below, the DOF range is 1.63m.

    As another example, should you choose f8 and align AF dot to 8, the green P dot indicate 7m. So the DOF is about 3.5m to infinite.  Referring DOF table indicates 3.23m-infinite (the red box). 

    This easy estimation method has limitations: (1) Doesn't work for f4 and f2.4 and (2) It is not a complete scale of DOF setting like a professional camera and only works if one end is infinite. 


    Set value

    (m)

    Depth of Field (in m) at f/stop
    2,4 4 5,6 8 11 16
    0.7 0.68-0.72 0.67-0.74

    0.66-0.75

    0.64-0.78 0.61-0.82 0.58-0.88
    (0.85) 0.82-0.88 0.80-0.91 0.78-0.93 0.75-0.97 0.71-1.03 0.68-1.14
    1 0.95-1.05 0.93-1.08 0.90-1.12 0.87-1.18 0.82-1.27 0.77-1.44
    (1.4) 1.31-1.50 1.26-1.57 1.21-1.66 1.15-1.80 1.07-2.03 0.98-2.51
    2 1.82-2.22 1.72-2.38 1.63-2.59 1.51-2.95 1.38-3.69 1.22-5.7
    (2.5) 2.21-2.86 2.08-3.14 1.94-3.51 1.78-4.22 1.59-5.93 1.39-13.97
    3.5 2.96-4.27 2.72-4.92 2.49-5.92 2.22-8.32 1.93-19.53 1.63-inf
    (5) 3.96-6.77 3.53-8.58 3.15-12.21 2.74-30.46 2.31-inf 1.89-inf
    7 5.12-11.08 4.42-17.00 3.83-41.66 3.23-inf 2.65-inf 2.11-inf
    (13.5) 7.88-47.77 6.32-inf 5.28-inf 4.14-inf 3.22-inf 2.45-inf
    inf 18.78-inf 11.78-inf 8.35-inf 5.91-inf 4.2-inf 2.98-inf


  • Flash photography. Minilux employs a flash mechanism called flashmatic system. The shutter speed is always 1/60s in the auto mode. The flash is a constant power and a constant 1/800s duration. In the auto mode, the aperture selected will be based on the distance measured by the auto focus mechanism. When smaller aperture than f16 is needed Minilux would reduce the overlap time between the shutter opening time and the flash duration such that 1/20 of the 1/800s may be selected.

    The following also seems to be true:
    (1) The LCD panel may not show the actual aperture used when using flash in the auto mode, (2) Aperture in aperture-priority mode could be overridden by the flash mechanism in the auto program and flash-on modes and (3) In the flash on mode, the flash is on for the full shutter opening time.

    If you are just starting to use Minilux, set it in auto-program mode would give you nice photos most of the time since Minilux turn on the flash whenever there is not enough light. But there are a number of creative ways using the Minilux's flash that I simply listed here without examples. I admit I am not an expert in this field so you will have to experiment to find out optimum setting for yourself.

    (1) Flash-off mode to capture the mood of available light. I like this the best because it is predictable and natural. I use this for 99.9% of my shot. I use it so often that whenever I turn on the Minilux, it's second natural for me to press the mode button six times to get to this mode. Wish Minilux save this setting when it turn on. Sigh...

    (2) Flash-on with long time exposure on tripod for night scenes with subject lit by flash.

    (3) Flash-on with long time exposure handheld to capture clear subject with blurry background. Since subject is lit by the flash while the background by the long time shutter speed. Set aperture smaller for even slower shutter speed.

    (4) Try above technique at dawn or dusk so that subject is blurry and clear at the same time for dreamy effect. And deliberately move the camera in different ways.

    (5) Also experiment with aperture-priority mode working with above techniques.

    (6) etc, etc, etc. endless possibilities... 

  • For your reference, this is the flash range table for the Minilux (refer to color negative film, for slide film there is a reduction in range):

    Film Speed (in ISO) Flash Range with f2.4 (in m)
    50, 64, 80 0.7-5.1
    100, 125, 160 0.7-7.2
    200, 250, 320 0.7-10.2
    400, 500, 640 0.7-14.4
    800, 1000, 1250 0.7-20.3
    1600, 2000, 2500 0.7-28.8
    3200, 4000, 5000 0.7-40.7


  • Finally I would recommend "photo.net" to any serious photographer. Specifically, the "photo.net guide" is very helpful for me when I started photographing. Take a look at the article on using P&S cameras! It's worth reading at least three times.

[home]


All right reseved. Please obtain permission from me if you want to use any photo, image or literature.